FHSWVIEW - Form for Viewing Report Files
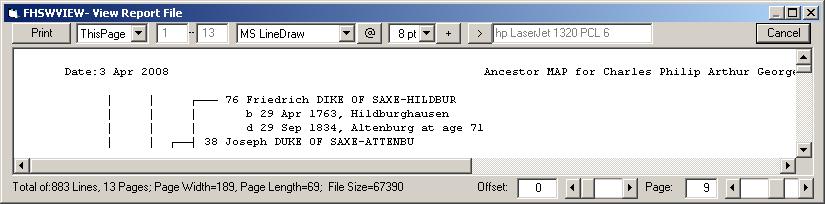
When the form is first shown (it defaults to full screen display although it may be reduced and resized), the report file must be read to locate the page boundaries. The left side of the last line on the form shows a running display of information about the file that is being read, including the total number of lines, the number of pages, the form width and length, and the file size. When all pages have been located, the first page will be displayed on the form.
If the page extends beyond the boundaries of the text box on the form, scroll bars can be used to scan the entire page. Two text boxes and slide bars on the right side of the last line of the form are used to change the page being displayed and the "offset" into the currently displayed page. (The "offset" is the number of print positions that are to the left of the first displayed character on the page.)
Note: In the 08/28/21 update changes were made to enable the viewing of "pages" that were too long or wide to be accomodated previously (when viewed pages could only have about 32000 characters). Very long Ancestor Maps (printed with "Continuous Forms") or very wide horizontal box charts (viewed "full width") can easily exceed that limitation for "pages" built for screen viewing. Now, displayed lines are limited to 500 characters. If scrolling to the right comes to a break in a line, adusting the "Offset" on the bottom line of the screen can move the beginning of the (500 character) line to the right so you can scroll farther by the "Offset" amount. Also, if scrolling down ends before a "page" is complete, the "Page" control at the bottom of the display can be used to advance beyond that. A "Line" value has been added to the bottom line, on the right (not shown in the picture here) that shows the number of the printline at the top of the current "page".The top line of the form has several controls that affect the appearance and printing of the text. Clicking on the current value for the "Font" opens a scrollable list of available fonts for the current printer. Selecting most fonts will result in the displayed text being reformatted to the way that it would appear when printed with the font. The only fonts that preserve the spacing of FHS reports and charts are the "fixed width" fonts, which include "Courier New" and "MS Line Draw". The latter one of these is important because it includes the standard line drawing characters in its symbol set, producing much nicer charts than the "typewriter symbols" that must be used with the other fonts.
Clicking the button labeled "@", to the right of the font selection field, will open a grid showing the printable symbols for the current font. If you change the font setting while the grid is displayed, the grid will be redisplayed to show the symbols for the newly selected font. Click the "@" button again to hide the grid.
The size of the font can be adjusted from 4pt to 12pt by clicking on the font size field and selecting the desired size from the drop down list. The currently displayed page will be adjusted according to the selected character size.
The button that is labeled "+", to the right of the selected font size, cycles thru several options for changing the weight and style of the font, including "normal", "bold", "italics" and "bold italics". NOTE: All text on the page is shown with the same emphasis.
A descriptive label for the current printer is shown in a text box on the top line. Clicking the button labeled ">" to the left of the printer label will open a standard Windows dialog for selecting a printer driver.
The "Print" button on the left side of the top line requests that all or part of the report file be sent to the printer. The text box next to the "Print" button shows the current print option. Clicking on the text box opens the option list which includes: "All Pages", "Current Page", and "Pages..". If you click on "Pages", then you can enter a range of pages in the text boxes to the right of the "Pages".
Clicking on "Cancel" closes the FHSWVIEW form and returns control to form FHSWRPGM or FHSWUPGM from which it was called.
NOTE: Changes to the font, font size and font style on this form do not affect the current printer setup and so will not affect the printing of reports directly to the printer from a report program. (See form FHSWPRNT)