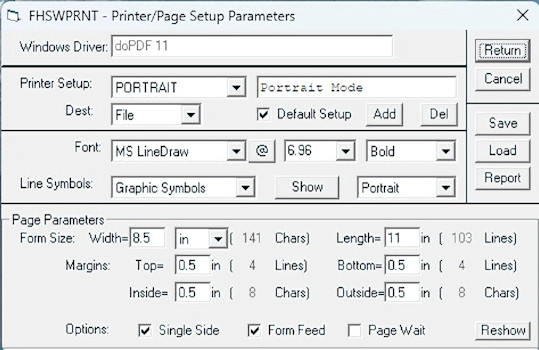
FHSWPRNT - Form for Viewing/Changing Printer/Page Setup Table
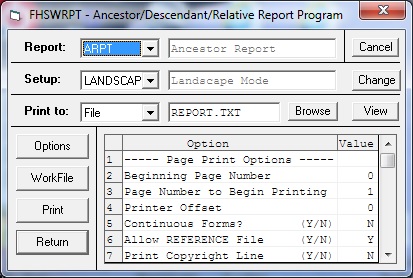
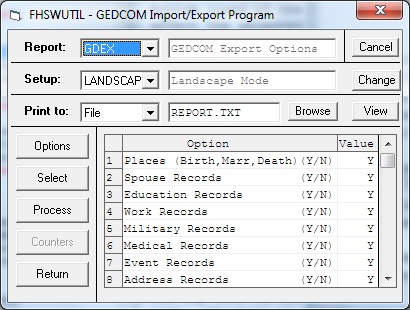
This form is called from the Main Menu, using the "Printer/Page Setup" item in the drop down menu for "File". It can also be called from the FHSWRPGM and FHSWUPGM forms by clicking the "Change" button to the right of the current "Setup" name.
The first line of the form identifies the current default Windows printer. Whenever you select a printer/page setup(e.g. from the FHSWRPGM or FHSWUPGM forms) the active printer remains the current default Windows printer. (To use a different Windows printer, you must exit the program and use Windows to change the default printer...NOTE: this does not have to be for a "real" hardware printer but could be a program driver such as one that creates a PDF of the "printed" output.)
The current printer/page setup is identified on the second line of the form. If there are multiple setups, clicking on the setup name opens a drop down list from which the other setups can be chosen. The setups are listed in the alphabetical order of the setup name. On the line below the setup name and description are fields for identifying the default destination for reports printed using the setup (Screen, File or Printer) and a "Check" box to indicate that the current setup is the default setup when the printer definition file is read from disk.
The "Add" and "Del" buttons, to the right of the "Default Setup" item, are used to add a new setup to, or remove the current setup from the printer/page setup table. There is effectively no limit to the number of setups that you can define.
The next portion of the form identifies the font that will be used to print reports. Clicking on the current font name will open a drop down list of fonts that are available with the current printer driver. This list is recreated whenever you select another windows printer. As a result, the font that has been associated with a setup may not be valid for the current printer. In that case, the selected font will be the one that results when the program attempts to assign the setup font to the active printer. The displayed font will become associated with the current setup if you Save the setup, select another setup, or leave the program by clicking the "Return" button.
The FHS reports and charts still require the use of a "Fixed Width" font in which each character takes the same amount of space on the report line. The "MS Line Draw" font distributed with recent versions of Windows is an appropriate font for these reports. Other fixed width fonts are available which simulate proportional fonts such as "Times".
Clicking the "@" button to the right of the font name opens a table showing the character set for the current font. Click the "@" button again to close the table view.
To the right of the "@" button are fields showing the current font size and font style. Clicking on either of these will open a drop down selection list for changing the item. If you select a font size, the font size will be applied to the current printer and the resulting printer font size will be redisplayed. The resulting value may not be the same as the one selected if the printer font does not print with the chosen point size.
Below the font style field is an item for selecting the "orientation" of the page. By clicking on the field, a drop down list will be opened from which you can select values of "Portrait" or "Landscape", where "Portrait" orientation has the printline parallel to the shorter side of the page and "Landscape" orientation has the printline parallel to the longer side of the page. If an error is returned to the program when it attempts to set the Orientation property of the printer, then the value shown will be "Unsupported".
Below the font name is a field labeled "Line Symbols" which identifies the symbol set for the characters that will be used to print lines and boxes in FHS charts. Clicking the current symbol set name opens a drop down selection list of choices: Typewriter, Graphic, Graphic 2 and Custom. The "Custom" setting is only used to designate a symbol set which has been modified by you. The "Typewriter" symbols are common symbols that should be supported by any font. The "Graphic" symbol set is taken from the symbol set that was used for the screen font under MS DOS. It includes standard single and double line graphic symbols. The "Graphic 2" symbol set would be supported by some international character sets which do not include the "double line" symbols.
Clicking the "Show" button next to the symbol set name opens a viewing area on the bottom portion of the screen in which the chart drawing symbols are shown. There are actually three sets of symbols: "Line Drawing Symbols", "Box Drawing Symbols" and "Hilited Box Drawing Symbols". The "Hilited" symbols are used to draw boxes along the "relationship path" in family path charts which include siblings. The "<" and ">" buttons in the lower right corner of the form can be used to cycle among the three sets of symbols. The symbols can be displayed in three different forms: as single characters (shown using the currently chosen font), as the decimal representation of the ASCII value for the symbol, or as the two character "Hexadecimal" representation of the number for the symbol. The button in the lower left corner of the form can be used to cycle through the different representations.
While the symbols are shown on the form as characters, the font may be changed to see if the chosen symbol set is properly supported by the font. The characters will be redisplayed using the chosen font. Each symbol may be customized by entering a value in the field for the symbol in the currently chosen representation (character, numerical or hex). The display of line/box drawing symbols can be removed by clicking on the "Hide" button, which will then become a "Show" button once more.
When the line/box drawing symbols are hidden, the lower portion of the form shows several "Page Parameters" which are used to identify the page size, the margin settings, and some other printing options. The settings include: Form Size (Width and Length), Margins (Top, Bottom, Inside and Outside) and Options ("Single Side", "Form Feed" and "Page Wait"). To the right of the "Width" field is an item that identifies the units in which the page size and margin settings can be entered. Clicking on the current unit size opens a drop down list of options for the unit: inch of measurement: "in" (inches), "cm" (centimeters) and "mm" (millimeters). The measurements should be entered in decimal values of these units. For example, an 8 ˝" page width would be entered as 8.5. To the right of each measurement is a field indicating the number of characters or the number of lines represented by the measurement using the current font size. Changing the font size will result in automatic adjustments to these counters.
The option settings are check boxes (clicking on the box toggles it on and off) for selecting the options:
- Single Side - which indicates that the report or chart is being printed on one side of the paper. If this option is not checked, then the program would alternate the "inside" and "outside" margins between the left and right sides of the paper and when you print a report or chart, you will be given the option of printing only even pages or only odd pages.
- Form Feed - which indicates that the report program will advance to the top of a new page using the "new page" option for the printer. If this option is not checked, then the program will advance to the top of a page by printing blank lines to "fill" a page.
- Page Wait - which indicates that the report program should pause at the end of each page and continue printing when a key on the keyboard is pressed. (Pressing the ESCape key would terminate the printing and pressing the PGDN key would continue printing without the pause at the end of each page.
The "Report" button opens a FHSWRPGM form for printing a report showing information from the Current Printer/Page Setup or for all setups in the current table. The "Report" button is disabled if form FHSWPRNT was opened from the FHSRPGM or FHSWUPGM forms.
The form is closed by clicking the "Return" or "Escape" button. If there are any unsaved changes to the printer symbols or page parameters for the current setup when the "Escape" button is clicked, they will be restored to the values from the setup table and the form will remain on the screen. Clicking the "Escape" button again will close the form.